- Android TextVew in Kotlin
- Android EditText Kotlin
- Android AutoCompleteTextView Kotlin
- CheckedTextView Android Kotlin
- Android Button Kotlin
- Android CheckBox Kotlin
- Android RadioGroup Example Kotlin
- Android RadioButton Example Kotlin
- Android ToggleButton Kotlin
- Android Switch Kotlin
- Android ImageView Kotlin
- Android WebView Kotlin
- Android SeekBar Kotlin
- Android CalanderView Kotlin
- Android VideoView Kotlin
- Android ProgressBar Kotlin
- Android RatingBar Kotlin
- Android SearchView Kotlin
- Android ConstraintLayout Kotlin
- Android LinearLayout Kotlin
- Android Spinner Kotlin
- Android ScrollView in Kotlin
- Android CardView Kotlin
- Android Interface Kotlin Example
- Android Airplane Mode, Bluetooth BroadcastReceiver example Kotlin
- Android Service Example
- Android Detect Phone Call BroadcastReceiver Kotlin example
- Android RecyclerView Kotlin Example
- Android RecyclerView Kotlin Example with model class
- Android sharedpreferences Kotlin Example
- Android Retrofit Example Kotlin
- Android Retrofit Example With RecyclerView
- Android Fragment Example Kotlin
- Android Auto Image Slider with URL Example Kotlin
- Android Bottom navigation Example Kotlin
- Android pdf viewer URL and Asset folder Kotlin example
- Android Audio Play Push Example Kotlin
- Scan QR Android Kotlin
- Create QR Code Android Kotlin example
- Android Collapsing toolbar Example Kotlin
- Current Location Android
- Google Map Android Example
- Search location Android kotlin
- Android Facebook login by kotlin
- View Binding Example kotlin
- Data Binding Example kotlin
- Onboarding Screen with ViewPager2 kotlin
- Android Lottie example kotlin
- Android Custom Toolbar Back Button Example kotlin
- Android Language Change example kotlin
- Dark Mode Light Mode Android Example kotlin
- Android Exit Alart Dialog kotlin
- Android Custom Dialog Popup kotlin
- Android Auto Image Slider Example kotlin
- SearchView from ArrayList kotlin
- Firebase phone authentication kotlin
- Image Download From URL and save in the folder
- Pagination in RecyclerView kotlin
- Shimmer Loading Effect kotlin
- Bottom Sheet Dialog kotlin
- Image, button transition left to right, right to left kotlin
- Voice To Text Example Android kotlin
- Image animation left to right, top to bottom Android Example kotlin
- Splash Screen Android Example kotlin
- Records audio and saves it to a folder Android kotlin Example
- Text Font add Android Example kotlin
- Take a picture from the camera set in the imageView Android kotlin
- Android Get Picture from folder set in image view kotlin
- Android Responsive Design layout for tab and phone kotlin
- Android Landscape and Portrait screen design kotlin
- Point my Current location Android kotlin
- Android Multi Select Spinner example kotlin
- Page Zoom Controls Android Example kotlin
- Dependency Injection with Dagger 2 Android kotlin Example
- Dagger Hilt Android Example kotlin
- Agora Video Audio Call Example kotlin
- Android Connect LAN printer and Print Data kotlin
- Android Connect bluetooth printer and Print Data kotlin
- DeepLink Android Example kotlin
- Socket Connection Android Example kotlin
- Web Scrapping Example in Android kotlin
- Button Click Open Gmail app and send email android kotlin example
- Firebase Email Verification Kotlin
- Button Click Text Zoom IN/OUT Android kotlin
- Zoom In /Out With Finger Touch Android kotlin Example
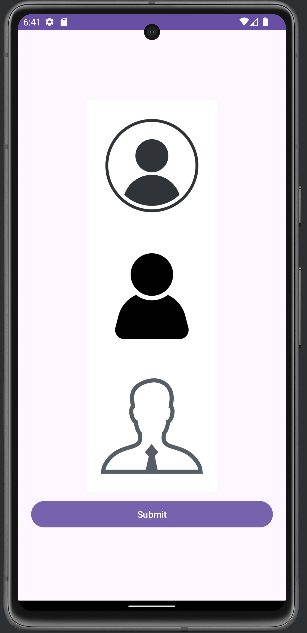
Android ImageView Kotlin
06-Dec-2024Learn how to display and style images with ImageView in Android Studio Project Kotlin
ImageView is a widget that is used to display images. You can use it to load images from various sources, such as resources, files, or the internet. Here's a simple example of using ImageView in an Android application:
There Are Some Common Attributes for ImageView :
| id | This ID serves as the control's unique identity. |
| layout_width | match_parent -> Text area contains fullscreen wrap_content-> Text area contains only text size |
| layout_width | match_parent -> Text area contains fullscreen wrap_content-> Text area contains only text size |
| scaleType | You can change Image Set Type center, centerCrop, centerInside, fitCenter, fitEnd, fitStart, fitXY |
Step 1:
File open res/layout/activity_main.xml file −:
<?xml version="1.0" encoding="utf-8"?>
<RelativeLayout xmlns:android="http://schemas.android.com/apk/res/android"
    xmlns:app="http://schemas.android.com/apk/res-auto"
    xmlns:tools="http://schemas.android.com/tools"
    android:layout_width="match_parent"
    android:layout_height="match_parent"
    tools:context=".MainActivity">


    <LinearLayout
        android:layout_width="match_parent"
        android:layout_height="match_parent"
        android:gravity="center"
        android:layout_margin="20dp"
        android:orientation="vertical">


        <ImageView
            android:id="@+id/imageView1"
            android:layout_width="200dp"
            android:layout_height="200dp"
            android:layout_marginTop="10dp"
            android:src="@drawable/profile1" />

        <ImageView
            android:id="@+id/imageView2"
            android:layout_width="200dp"
            android:layout_height="200dp"
            android:layout_marginTop="10dp"
            android:src="@drawable/profile2" />

        <ImageView
            android:id="@+id/imageView3"
            android:layout_width="200dp"
            android:layout_height="200dp"
            android:layout_marginTop="10dp"
            android:src="@drawable/profile2" />

        <Button
            android:id="@+id/submitButton"
            android:layout_width="match_parent"
            android:layout_marginTop="10dp"
            android:layout_height="wrap_content"
            android:text="Submit" />
    </LinearLayout>


</RelativeLayout>
Step 2:
File open com.microappvalley.newtestproject/MainActivity.kt file −
Kotlin:
package com.microappvalley.newtestproject

import android.annotation.SuppressLint
import android.graphics.BitmapFactory
import androidx.appcompat.app.AppCompatActivity
import android.os.Bundle
import android.widget.Button
import android.widget.ImageView
import android.widget.Switch
import android.widget.Toast

class MainActivity : AppCompatActivity() {
    @SuppressLint("MissingInflatedId")
    override fun onCreate(savedInstanceState: Bundle?) {
        super.onCreate(savedInstanceState)
        setContentView(R.layout.activity_main)
        val  imageView1:ImageView=findViewById(R.id.imageView1)
        val  imageView2:ImageView=findViewById(R.id.imageView2)
        val  imageView3:ImageView=findViewById(R.id.imageView3)

        // Image Set From drawable
        imageView1.setImageResource(R.drawable.profile1)

        //Set Iamge From Bitmap
        val bitmap = BitmapFactory.decodeResource(resources, R.drawable.profile2)
        imageView2.setImageBitmap(bitmap)

    }
}
Open Device Manager, run the emulator, and then run the application. Next, check the working output and check the output you declared in your code.